We sell our basses direct to the customer only. Therefore, we do not have a dealer network. Please see our Basses page in the Store.
Because there are no keys on the headstock to counteract the weight of a vibrating string, the neck had to be made stiffer. Using a 34 laminate neck addressed this issue. The laminates are glued perpendicular to the ebony fingerboard with the added benefit that the accumulated glue joint tension makes the neck unwilling to twist.
Use a standard screwdriver – either Phillips or slot type. While sighting down the neck, rotate the nut. There is no need to loosen the strings.
The patented string clasp is available only on the Ex Factor.
While holding the bass in playing position , push the spring loaded string clip up with the thumb of the left hand. Pull the string out from under the clip head with your finger and release the lever. You are now in concert tension “D” and all the notes on the scale remain the same-no transposing. Pushing the lever up causes the lever to re grab the string and you’re back in “E” again. It’s very quick and easy to become adept at. When the string is in “D” tuning you also have a “D#” note available.
The patented tuner /bridge module is a body mounted tuning system that replaces tuning keys on the head. This is what makes the bass absolutely not head heavy. To install a string, place the ball end into a bronze cup in the head of the neck. The tail end is then inserted into a hole in a wheel in the bridge. Bend the string towards the neck and roll the wheel by hand to ratchet up all the excess string. The tuning knob can then be rotated to tune the string to pitch. The tuning knob glides on a ball bearing and tunes at an 80 to 1 ratio. Removing a string involves loosening the tuning knob till the string is loose, then pressing down on the ratchet spring head allowing the wheel to rotate in the opposite direction as the string is pulled off.
The patented bridge is an integral part of the tuner. The bridge head holds an assembly comprised of a saddle post that is threaded into a saddle slider. The saddle slider can be adjusted to achieve intonation and can then be locked in place with a screwdriver. The saddle post can be adjusted for string height by rotating it up or down. The saddle and saddle slider are made of stainless steel.
Yes, with a few exceptions. We do not sell the bridge tuner as a complete assembly. It is modular, therefore, to repair you only need to purchase specific parts. You also cannot buy the string clip/clasp arm without returning the original.
The 9 volt preamp is a pared down version of the original 18 volt preamp. Both preamps use the same pickups. The 9 volt was intended for use in the more economical Key Factors. Click here for a detailed comparison.
The preferred payment method is via PayPal. PayPal buttons are included on the Store pages. Or you can provide us with your PayPal user account email and we will send an invoice from which you can make payment. Additionally, check or money order is accepted in which case payment will be cleared before shipment is made.
For now the only instrument available is the Ex Factor 4 bass in fretted or fretless. We make them to order so you can choose the color you want.
Ex Factor – Extended E fret and Zero Nut Fret is .118” wide x .058” tall (Dunlop 6000). All other frets are .103” wide x .046” tall (Dunlop 6155).
Factor 34” – .103” wide x .046” tall (Dunlop 6155)
Fretless Ex Factor – Extended E fret and Zero Nut Fret are .106” wide x .036” tall (Dunlop 6130)
1-22 Kubicki Prototypes
23-761 02/85 – 02/88. Made at Kubicki Santa Barbara, CA facility.
1000-1292 02/88 – 02/89. Made under Fender License Agreement at Kubicki Santa Barbara, CA facility.
1293-3049 3/89 – 02/91. Made at Fender Custom Shop in Corona, CA.
3050-XXXX. 07/91 – present. Made post Fender Agreement.
We don’t sell decals, but we do allow them to be ordered from online suppliers to whom we will supply the artwork.
When using a decal, the painter really needs to be the one to determine what the right one is since it depends on the type of bass body finish used as to whether you need a vinyl rub-on or a lacquer waterslide decal.
If nitro or lacquer finish is used, a water slide type decal is generally needed and we already have the artwork on file with Rothko and Frost – https://www.rothkoandfrost.com/guitar-making-supplies-c83/headstock-decals-c1/bass-c146
If urethane or a polyester finish is being used, more than likely you’ll need a vinyl or foil rub-on type decal. Let us know if your painter does not have a source and we will locate one for you.
The Blaster Bass was never licensed for manufacture by Philip Kubicki. The facts are that we did negotiate with a Japanese company to make instruments for the Japanese market only and they made us a sample Blaster Bass along with another sample of an Extender Bass for approval. We did not approve either of the basses and no agreement was ever signed. The following year we signed a licensing agreement with Fender Musical Instruments. Fast forward 10 years and these 2 samples suddenly seemed to multiply into more. We have no idea when they were made so don’t know if more than a couple of the sample basses were made and they decided to unload them or if more were made later using the tooling. There seems to be a limited supply of them though and replacement parts are not available, so I suspect the company jumped the gun thinking an agreement was going to be signed and made more than just the samples which they later offloaded. It’s a shame because some people buy these basses thinking they were licensed and that we can support them, but the reality is most of the parts on them, including bridge/tuner are not interchangeable with the Ex Factor 4 bass parts so we are unable to help.
Yes. Philip Kubicki Technology designed, patented and produced Factor basses beginning in 1985 with serial number 1. Serial numbers 1293 through 3049 were made under the licensing agreement with Fender Musical Instruments from 1988 through 1991. Since then, all Factor basses since then have been made by Philip Kubicki Technology. We service all Factor basses.
While there are a few parts that are over-the-counter the majority are manufactured to our specifications. We maintain a stock of all parts. Please see our Repair Parts page in the Store.
The shorter 32″ scale of the Ex Factor 4 bass requires the use of slightly heavier gauge strings – .045, .065, .085, and .105. The overall length needed for the .045, .065 and .085 is 42″ with 38″ full wrap. The overall length for the .105 string is 46″ with 39 1/2″ full wrap. Packaged string sets may be purchased in the Store on the Strings page.
Allen Wrench Size:
3/32″ – Tuner Strap Button Screw
3/32″ – Pickup Mounting Screw
5/32″ – Neck Mounting Screw
5/32″ – Tuner Mounting Screw
5/64″ – Tuner Housing Cover Screw
5/64″ – Knob Set Screw
1/8″ – String Clip Bolt
.050″ – Key Factor 4 and 5 Saddle Height Screw
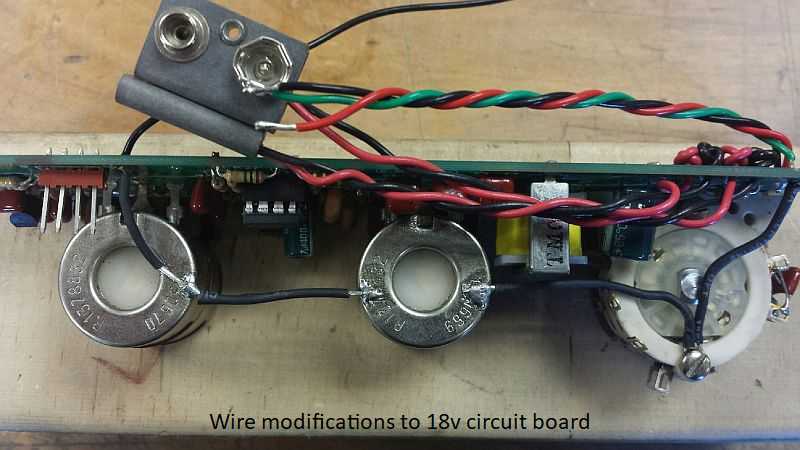
Active electronics are highly sensitive to outside interference which affects it as noise. To prevent interference, the control cavity (including the cover plate) is lined with shielding paint or shielding tape thereby creating a capsule around the preamp. As the shielding ages/wears the connection to the preamp becomes degraded and interference (electrical, radio, microwave noise) is allowed in. This connection is made through the jack. When the jack is tightened against the inside of the painted cavity, the shielding paint is effectively grounded. If the jack has worked loose or has been changed many times, it is possible for the paint in this area to become worn away. This results in a shielding cavity that is no longer grounded. A shield cavity that is ungrounded will add noise to the circuit. It is important that the pots and switch on the preamp also remain well connected to the shielding. Loss of contact on these components leads to noise when you touch the knobs.
To correct these issues, the control cavity should be repainted with shielding paint or lined with copper foil. When painting, pay particular attention to the area that contacts the jack, the pots and the switch. While copper foil is a better product for shielding, it is difficult to use and care must be taken to assure that components on the board do not inadvertently become grounded.
We also recommend physically grounding the backs of the pots and metal of the switch by soldering wire to the backs of the pots and terminating the wire under the screw on the switch frame. See the photos below. Note that the wire is a continuation of the green wire from the jack and the bridge ground wire on the board. This modification eliminates the need of the shielding paint to bond the pots and switch as well as providing multiple points of contact to ground the shielding paint. If you are not familiar with soldering work on printed circuit boards, we recommend you have this work done by a competent technician.