Downloadable Owners Guides:
Online Ex Factor and Factor 4 Basses Owners Guide
ACTIVE ELECTRONICS – 18v/6 position switch
Your Kubicki bass is equipped with hybrid passive and electronic circuitry. Choosing between passive and active modes will depend on your requirements. Each mode has its own distinctive tonal characteristics. For equalization the signal can be boosted to 25dB in the active modes by the battery powered solid state electronics.
ACTIVE ELECTRONICS – 9v/4 position switch
Your Kubicki bass is equipped with hybrid passive and electronic circuitry. Choosing between passive and active modes will depend on your requirements. Each mode has its own distinctive tonal characteristics. For equalization the signal can be boosted to 17dB in the active modes by the battery powered solid state electronics.
⇑
VOLUME CONTROL – 18v
The volume control allows you to control the volume level of the instrument.
VOLUME CONTROL – 9v
The volume control allows you to control the volume level of the instrument.
⇑
PAN CONTROL – 18v
The pan control allows you to balance the level of the two pickups. In the center detent position, the pickups are approximately equal in volume. Rotating the control counterclockwise from the detent position raises the level of the bridge pickup, while lowering the level of the neck pickup, for a sharper, brighter tone. With the knob in the full counterclockwise position, the neck pickup is all the way off. Rotating the knob clockwise from the detent position has the opposite effect – the neck pickup volume is raised, while the bridge pickup volume is lowered, for a warmer tone.
PAN CONTROL – 9v
The pan control allows you to balance the level of the two pickups. In the center detent position, the pickups are approximately equal in volume. Rotating the control counterclockwise from the detent position, raises the level of the bridge pickup, while lowering the level of the neck pickup, for a sharper, brighter tone. With the knob in the full counterclockwise position, the neck pickup is all the way off. Rotating the knob clockwise from the detent position, has the opposite effect – the neck pickup volume is raised, while the bridge pickup volume is lowered, for a warmer tone.
⇑
TONE CONTROLS – 18v
The two center stacked tone knobs operate in the active modes only. The upper knob can be used to boost the bass frequencies up to 30dB at 15kHz. When the selector switch is in the passive settings, these knobs have no function.
TONE CONTROLS – 9v
The two center stacked knobs are tone controls. When the selector switch is in one of the two active settings, the upper knob can be used to boost or cut the treble frequencies by up to ±15dB at 40Hz. For both controls, the center position is flat: rotating the knobs counterclockwise cuts frequencies and rotating them clockwise boosts frequencies. When the selector switch is in the passive setting, the upper knob has no function, and the lower knob functions as a standard passive tone control.
⇑
ROTARY SWITCH – 18v
The electronics are controlled by the 6 position rotary switch:
1. Standby (full clockwise position) – All controls are completely off. This position is handy for changing strings or in other situations where you want no output. This position does not disconnect the batteries.
2. Active, flat – The bass and treble tone controls are active.
3. Active, with middle frequencies boosted – The bass and treble tone controls are active.
4. Passive, flat
5. Passive, with middle frequencies cut
6. Passive, with high frequencies cut (full counterclockwise position)
ROTARY SWITCH – 9v
The electronics are controlled by the 4 position rotary switch:
1) Standby (full clockwise position) – All controls are completely off. This position is handy for changing strings or in other situations where you want no output. (This position does not disconnect the battery.)
2) Active, with Presetable Mid Boost – The bass and treble tone controls are active. There is also a presetable amount of boost added to the midrange frequencies. Your bass was factory preset for maximum midrange boost. To adjust the amount of mid boost, remove the back cover plate and adjust the miniature potentiometer, R19, with an appropriate screwdriver. The amount of mid boost can be adjusted from approximately 1dB to 8dB. Maximum mid boost occurs at full clockwise rotation. Be careful not to adjust it beyond its natural rotational limits.
3) Active, flat – The bass and treble controls are active.
4) Passive (full clockwise position) – The lower tone control knob (bass) acts as a standard tone control—brightest in full clockwise position, with the highs rolling off as you rotate the knob counterclockwise.
⇑
BATTERIES – 18v
The passive circuits will operate without the batteries. The active circuits require two 9V alkaline batteries that function for approximately 1,000 hours of use. You’ll know when it’s time to change the batteries when the signal gradually fades and becomes distorted. Plugging your cord into the bass activates battery use. For maximum battery life unplug your cord from the bass when not in use. When replacing the batteries, be sure to unplug the cable connected to your bass’s phone jack. This will guarantee protection from accidental battery polarity reversal during installation which could destroy your preamp’s integrated circuits. To replace the batteries, remove the back cover plate with a small Phillips screwdriver.
BATTERIES – 9v
The passive circuits will operate without the batteries. The active circuits require two 9V alkaline batteries that function for approximately 1,000 hours of use. You’ll know when it’s time to change the batteries when the signal gradually fades and becomes distorted. Plugging your cord into the bass activates battery use. For maximum battery life unplug your cord from the bass when not in use. When replacing the batteries, be sure to unplug the cable connected to your bass’s phone jack. This will guarantee protection from accidental battery polarity reversal during installation which could destroy your preamp’s integrated circuits. To replace the batteries, remove the back cover plate with a small Phillips screwdriver.
⇑
PICKUPS
The special humcancelling™ pickups on your Kubicki bass work as either high or low impedance pickups, depending on how the active electronics controls are set. They are fully adjustable for height and tilt.
⇑
⇑
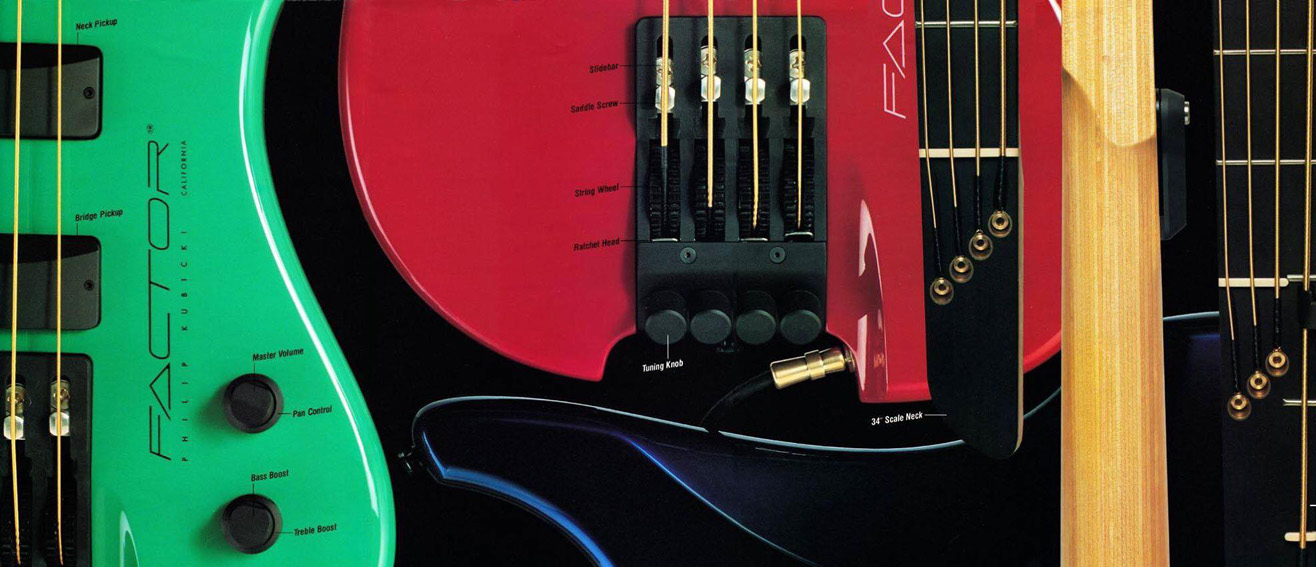
STRING REMOVAL
Place your bass on a clean flat surface. Rotate the tuning knob counterclockwise until it stops. DO NOT force it any further. Lift the string off the bridge saddle screw to further reduce string tension. With your first finger on the ratchet spring head and your thumb on the string wheel, pinch the ratchet head towards the string wheel, controlling the spin of the wheel with your thumb while pulling the string off with your free hand.
NOTE: If the string wheel won’t release, reduce string tension by rotating the string wheel towards the tuning knob while pressing the ratchet spring head down.
⇑
STRING INSTALLATION
With the tuning knob completely unwound (ratchet spring head exposed), insert the tail end of the string all the way into the string wheel hole. Bend the string against the hole edge towards the bridge saddle screw. Place the ball end of the string in its appropriate retainer on the headstock. Keeping tension on the string, rotate the string wheel toward the tuning knob until all the string slack is taken up (the string should be off of the saddle screw). Being careful not to kink the string, pull up on it gently to seat the warp on the string wheel. Rotate the string wheel to take up any additional slack from the seating of the string.
NOTE: Thumb tension is all that is necessary. Using tools to tighten the string wheel could result in damage to the teeth on the string wheel. Lift the string onto the bridge saddle screw and turn the tuning knob clockwise until the string reaches pitch. DO NOT force the tuning knob once it has come to the end of its travel. If the tuning knob stops turning before the string is in pitch, either not enough slack was taken out or the string length is too short. There must be enough length for one and one half wraps of string on the string wheel. If the string is long enough then simply unwind the tuning knob all the way. Lift the string off of the saddle and rotate the string wheel an extra click before placing the string back on the saddle. It should now tune up to pitch using the tuning knob.
⇑
STRING CLASP
The Ex Factor bass features a patented “E to D” string clasp. The E string can be extended to a D without retuning or even stopping your playing.
Disengaging the String Clasp (“D” tuning)
To go from E to D tuning, place your hand in normal playing position near the headstock. Place your thumb on the back of the string clasp lever arm, push it up until it stops, and hold it there. Pull the E string towards the G string with one of your fingers and hold it there. Release the string clasp lever arm, which will recess down into the neck. Then release your finger, allowing the E string to slide back into its normal position – over the string clasp lever arm. You are now in “extended” or “D” tuning.
Engaging the String Clasp (Normal “E” tuning)
To go from D to E tuning, place your hand in normal playing position near the headstock. With one of your fingers, pull the E string towards the G string and hold it there. Place your thumb on the back of the string clasp lever arm, push it up until it stops, and hold it there. Release your finger, allowing the E string to slide back into its normal playing position. Then release the string clasp lever arm, which should now be pressing down on the E string. You are in “normal” or “E” tuning.
⇑
SETTING UP YOUR BASS
You may need to adjust your bass because of travel effects, climatic conditions, a change in your string gauges, or to accommodate your playing style. The following procedure outlines the standards set at the factory. To make these adjustments, you will need the following equipment:
3/32” Allen wrench
5/16” End wrench
Phillips #2 screwdriver
Capo
Mechanic’s feeler gauge
6” (15.2cm) Mechanic’s ruler
Caution: It is important to do these interdependent adjustments in the order presented. Failure to do so may produce undesirable results.
1. Tuning
Tune the instrument to standard pitch.
2. Adjust Neck Curvature (Truss Rod)
Under normal tension, the neck should have a slight concave curvature. By creating a counteracting force, the truss rod prevents the neck from bending excessively under the stress placed on it by the strings. The tension on the rod is adjustable so the correct curavature can be achieved by regulating the neck’s resistance to string tension. To check the truss rod setting, tune the bass to playing pitch. Install a capo at the first fret, and depress the 4th string at the last fret. Using a feeler gauge, check the gap between the bottom of the 4th string and the top of the 8th fret. The recommended string clearance is approximately 1/32” (.03125) to 1/16” (.0625), or .79375 mm to 1.5875mm. The truss rod is adjusted at the tip of the headstock with a #2 Phillips screwdriver. If the neck is too concave (the strings are too far away from the fretboard), turn the screwdriver clockwise. If it is too straight or convex, turn the screwdriver counterclockwise.
Caution: DO NOT continue adjusting: 1) If extreme resistance is felt while adjusting in either direction, or 2) If the neck has a convex bow that remains when the truss rod is loosened. Contact us for assitance or take the instrument to your nearest guitar repair center.
Note: The truss rod should not be left loose, but should be tightened by at least a quarter turn.
3. Set Bridge Height
The recommended string clearance at the fret where the neck joins the body (measured by the distance between the bottom of the string and the top of the fret) is:
4th string – 5/32” (3.96mm)
3rd string – 9/64” (3.57mm)
2nd string – 9/64” (3.57mm)
1st string – 1/8” (3.17mm)
Each bridge saddle may be individually adjusted to the desired height by carefully turning the bridge saddles in half turn increments with a 5/16” end wrench. Counterclockwise motion raises the saddle and clockwise motion lowers it. Use the mechanic’s feeler gauge to test your settings against the above standards. The instrument should be adjusted so that it provides comfortable playability, free of rattle. The optimum height adjustment varies from player to player due to differences in technique and playing styles. The recommended settings in this manual have proven ideal for most players.
4. Set Pickup Height
The pickups are height adjustable. This allows you to balance the overall volume between one pickup assembly and the other. Adjustments are made by turning the pickup adjustment screws located at either end of the pickups. The recommended string clearance (3/32” is measured using a 6” (15.2cm) mechanic’s ruler) between the pickup and the bottom of each string when pressed at the last fret.
Note: Pickups set too close to the strings can cause false tones and loss of sustain.
5. Adjust Intonation
The bridge allows length adjustment of each string to ensure proper intonation. For optimum results, these adjustments should be made when the strings are in new condition. Tune the bass. Set the pan control so the neck pickup is all the way on, and the tone and volume controls are at the maximum settings. Check the intonation of each string with an electronic tuner by playing the open string harmonic at the 12th fret and comparing this note with the note produced by fretting the string at the 12th fret. The pitch should be the same, ±1 cent (1/100th of a semitone). If fretted note is sharp, the string must be lengthened by moving the bridge slider back (towards the tuning knobs). This is done by turning the bridge slider lock screw clockwise to loosen the bridge slider, and then sliding the saddle. If the fretted note is flat, the string must be shortened by moving the slider forward (toward the neck). After each adjustment, retune and repeat the test and adjustments until the harmonic and the fretted note both produce the same pitch.
⇑
CARE OF YOUR BASS
Your new Kubicki bass is precision-made to give you many years of satisfaction. A few simple maintenance procedures will help keep your instrument playing like new. After you have finished playing, thoroughly wipe the entire instrument, including the strings, with a clean, soft, 100% cotton cloth. Avoid expositing the bass to any chemical or substance that might mar the finish, or to direct sunlight or other source of excessive heat, humidity or shock.
Caution: It is important to avoid sudden changes in temperature, since this causes the wood to expand at a different rate than the finish, which may result in damage to the finish. While this condition does not affect the tone, it does affect the appearance. Let the instrument warm up in its own case. Then open the case slowly, allowing warm air to enter gradually. After the instrument is removed, leave the case open so it too can warm up thoroughly. String tension should be reduced during shipping to avoid possible damage.
⇑